Custom email aliasing – throw-away emails using a custom domain
There's been a rise in services that provide email aliases to help keep your identity safe and prevent your actual email address from getting sold off to every information broker and advertising company out there.
For anyone who isn't familiar with how this works, it essentially
lets you generate an email "on-the-fly", something like
a1b2c3d4@domain.com, and all email that gets sent there is
redirected to your actual email address. What's cool is that you can
then "delete" that email in just a few clicks if it starts
receiving spam.
This lets me do things like fully-functional, semi-randomly generate email addresses like PT1Eb2lBelk1VzNxaWtKWXd5enB5TzBLc3UwRENPSUVzOXlZYTlUb3Y1Rk0weTJw (which will change whenever you reload this page, but still points to the same inbox behind the scenes).
And because I always look for a free (and ideally open-source) alternative before even considering paying for software and online services, I went and found an essentially free setup that gives me a ton of control over how the emails are handled and uses my own domain name. It uses Cloudflare's configurable email routing and workers, which I'll show you how to set up in this post.
[!WARNING]
Now, before I start explaining how you can set this up yourself, it's important to note that aliases using a custom domain mean you lose the main privacy benefit of email aliases: all your emails will come from a single domain, that you will likely be using for youself and possibly your friends and family. So contrary to all the paid services I mentioned, advertisers and information brokers will easily be able to tie all of your aliased email come from the same person and bundle them together for tracking purposes.But you still get the ability to block spam-ridden aliases and it may reduce some amount of tracking.
[!NOTE]
I'm by no means an expert in DNS management and configuration. I'll try to provide enough details throughout the guide to cover most of the information you should need, but keep in mind that there's a TON of detailed information out there about all the intricacies!
Requirements
Before we start, this guide assumes that you already have:
- A custom domain name to work with.
- One or more working email addresses. (I haven't checked, but I'm fairly certain you can even use email addresses from the same domain name you're going to use for the aliases.)
[!WARNING]
Your destination address cannot use the same domain name as your aliases! Because of the DNS trickery we're using, you'll either want to use an email provider (like@proton.meor@gmail.comfor example), or a custom address on a separate domain.
Switching DNS management over to Cloudflare
Unless you're already using Cloudflare to handle your domain's DNS config, let's start by setting that up.
[!IMPORTANT]
Before you do anything, I'd recommend you go over to the DNS records management page of your current setup (most likely on the site of the registrar from which you rent your domain name) and back things up. Some registrars have easy tools to back up or export the DNS records config, but you can just as easily manually copy things over to a text file.
1. Initial setup
Unless you already have a Cloudflare account, you should start by creating one. This will become the new home for managing both your DNS records and your email aliasing setup.
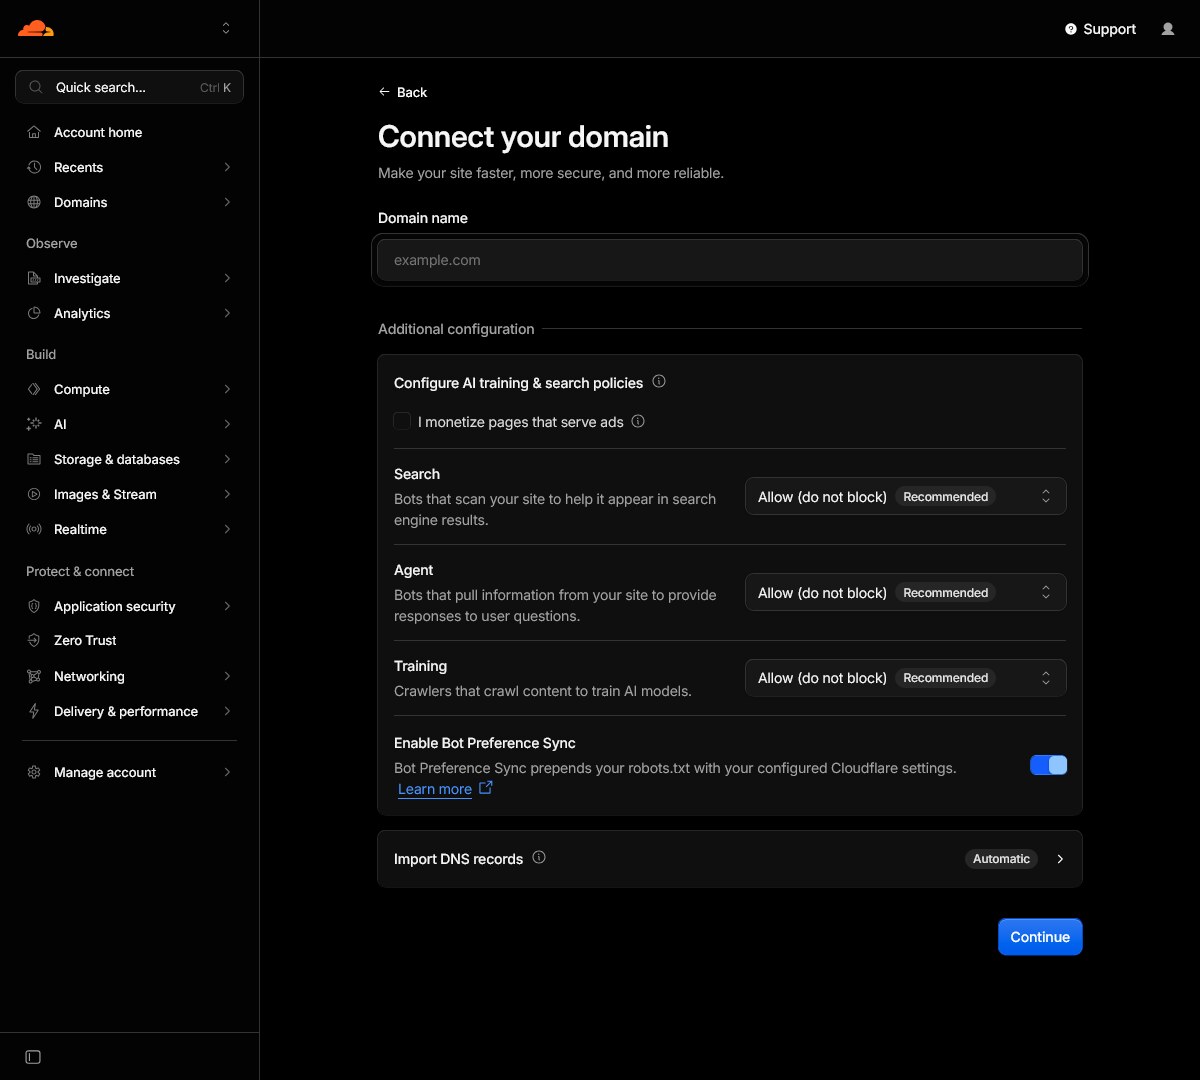
In the Cloudflare dashboard, navigate to Domains ->
Overview -> Add domain, and select
Connect a domain, which should walk you through moving your
domain's DNS management over to this Cloudflare account.
[!TIP]
During this setup, you'll get a chance to define the policies that tell AI whether it can read/train on your data. This is a cool added benefit of the change we're making.
The setup wizard will likely get an option to automatically transfer the DNS records over. This is generally quite easy, but depending on your specific registrar, automatic transfer may not be available. In that case, there should be lots of documentation online to help you point your domain to the Cloudflare nameserver and re-enter your DNS records config manually.
2. DNS records
Now go in and check how your DNS records are set up by opening
Domains -> Overview ->
{your-domain} in the dashboard and then
DNS -> Records. From now on, this is where
you can modify the DNS records for your domain.
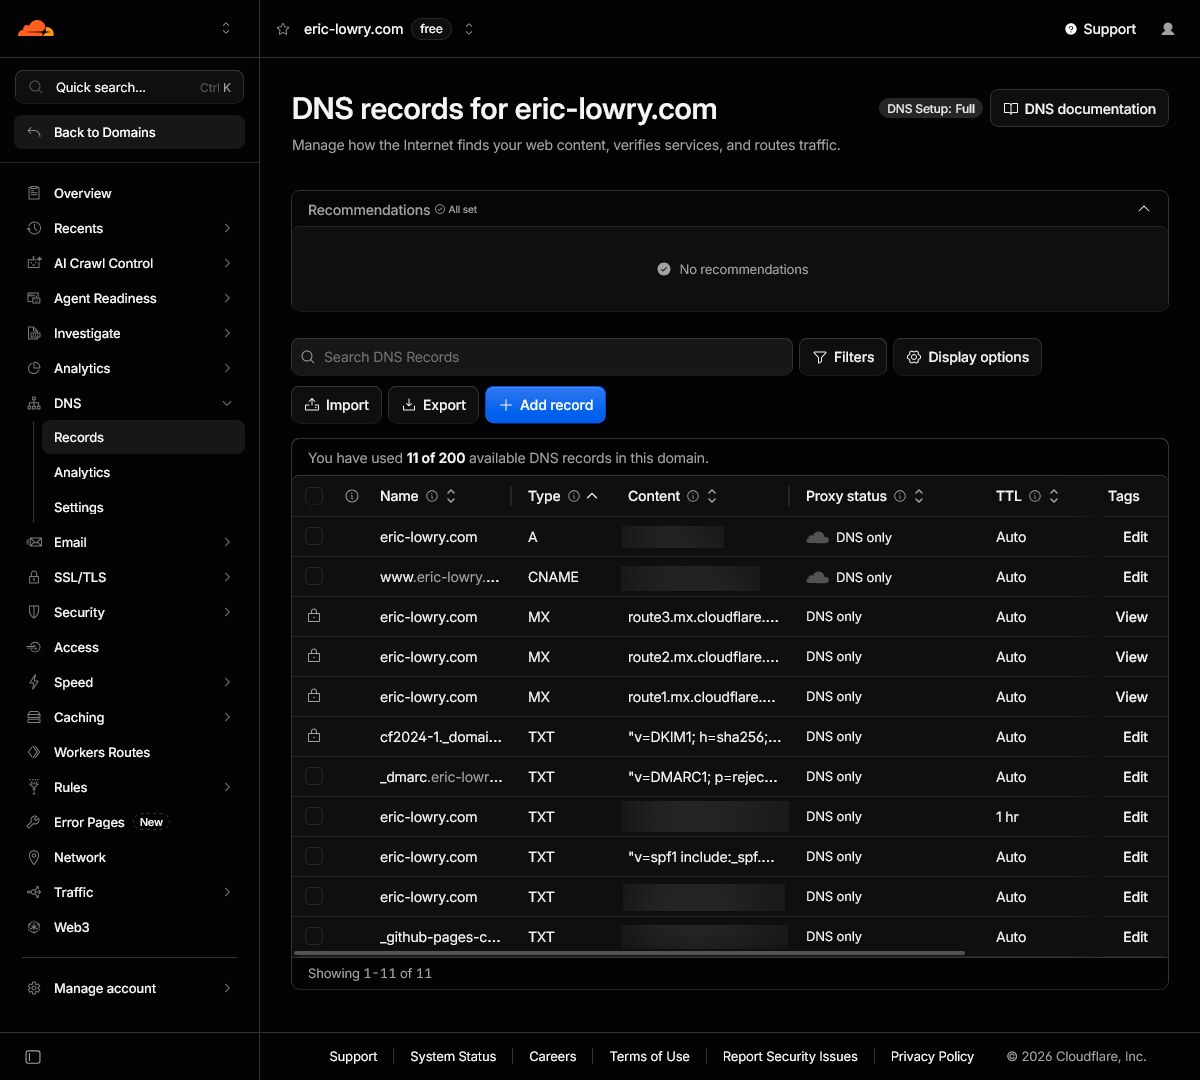
First, make sure all your A and CNAME records
were imported correctly.
If you had previous email hosting on this domain, there may be old
MX records left behind. These will be replaced later when
we turn on Cloudflare Email Routing, so leave them be.
You'll also want to check all your TXT records to
ensure things like site ownership checks don't break. If you're
unsure what a record does, check online or ask for help; it's often
less complicated than it looks.
[!WARNING]
If, like me, you're using something like Firebase or GitHub Pages to host a website, you should make sure that the Cloudflare Proxy status (the cloud icon) for the correspondingAorCNAMErecords is set to "DNS Only" (grayed-out cloud icon) so Cloudflare doesn't mess with SSL certificate management.
You'll get warnings around the Cloudflare UI about not being fully protected and the like, which you can safely ignore for these.
And finally, you may see a TXT record starting with
v=spf1.
You will need to replace this entry, or create
it, with the following value:
v=spf1 include:_spf.mx.cloudflare.net ~all. This is
required for the email routing we'll set up later to work.
3. Nameserver Delegation
[!WARNING] DNSSEC
Depending on how things are set up with your existing registrar, you may need to disable the "DNSSEC" option, which helps ensure no unwanted changes happen without you noticing.
This change can take a while to propagate across the DNS network, so it's a good idea to wait 24 hours before moving on to the next step if DNSSEC was initially enabled to ensure it's now properly disabled.
Look for the Cloudflare nameserver addresses in your dashboard under
Domains -> Overview ->
{your-domain} -> DNS ->
Settings.
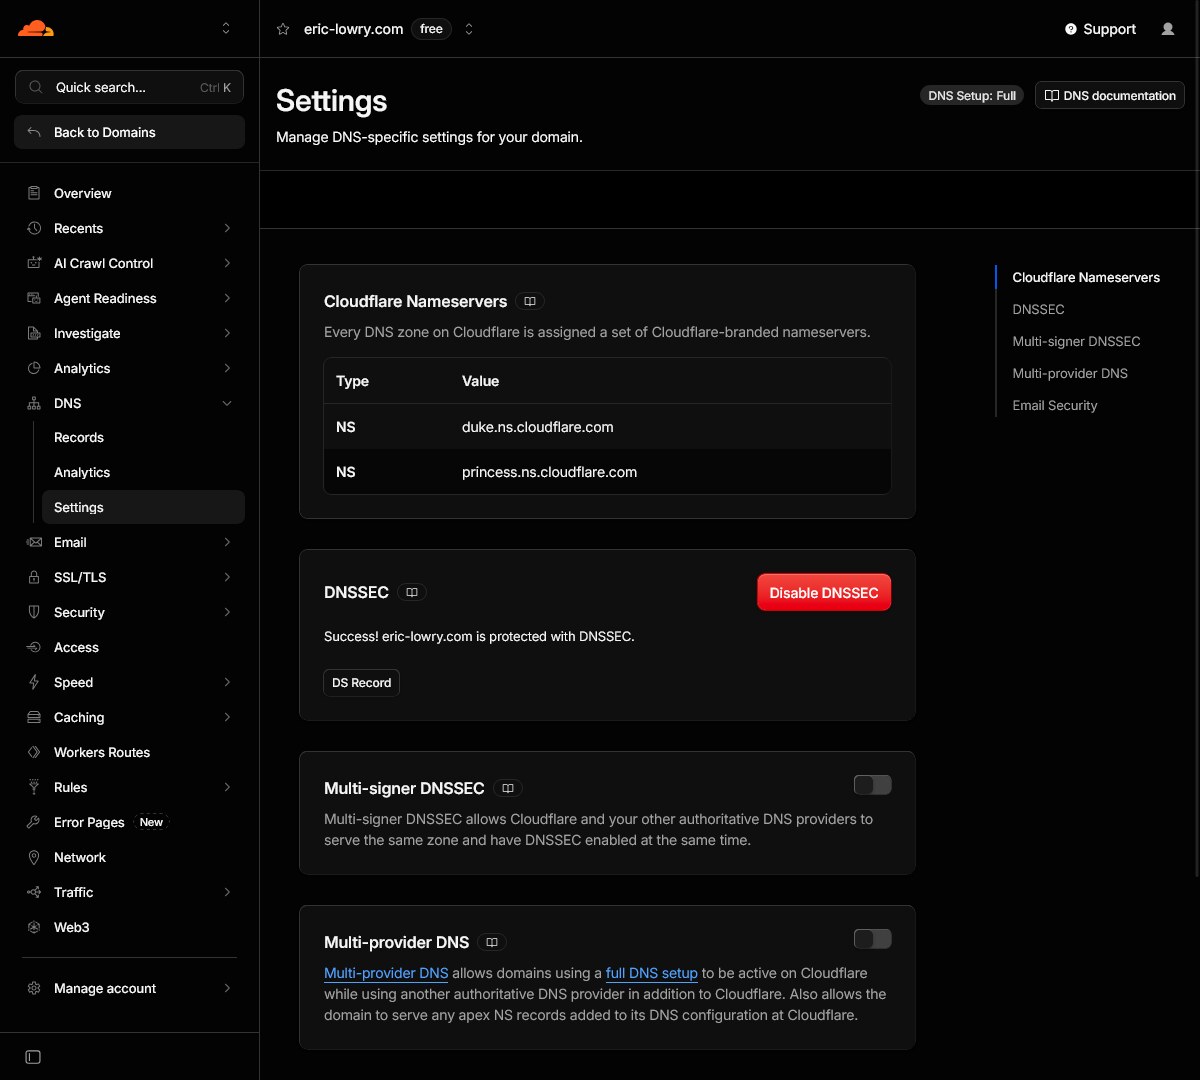
You'll now want to go back to your domain registrar's settings and override their default nameserver addresses with these.
Here, you may need to wait a few minutes, or even up to a few hours depending on how fast the DNS change propagates. Then, Cloudflare will have taken over and will be in charge of your domain's configuration. Luckily, we already set it up, so any services that rely on this should keep functioning as if nothing hapened.
We'll come back to finalize some DNS stuff at the end, but now it's time to set up the actual email routing magic.
Setting up Email Routing
To actually get Cloudflare to forward emails that get sent to your domain over to the actual email address you use, we need to register that "destination" email, and connect everything together.
4. Destination Email Verification
First, return to the Cloudflare dashboard root by clicking the orange
Cloudflare icon in the top-left, and then navigate to
Compute -> Email Service ->
Email Routing.
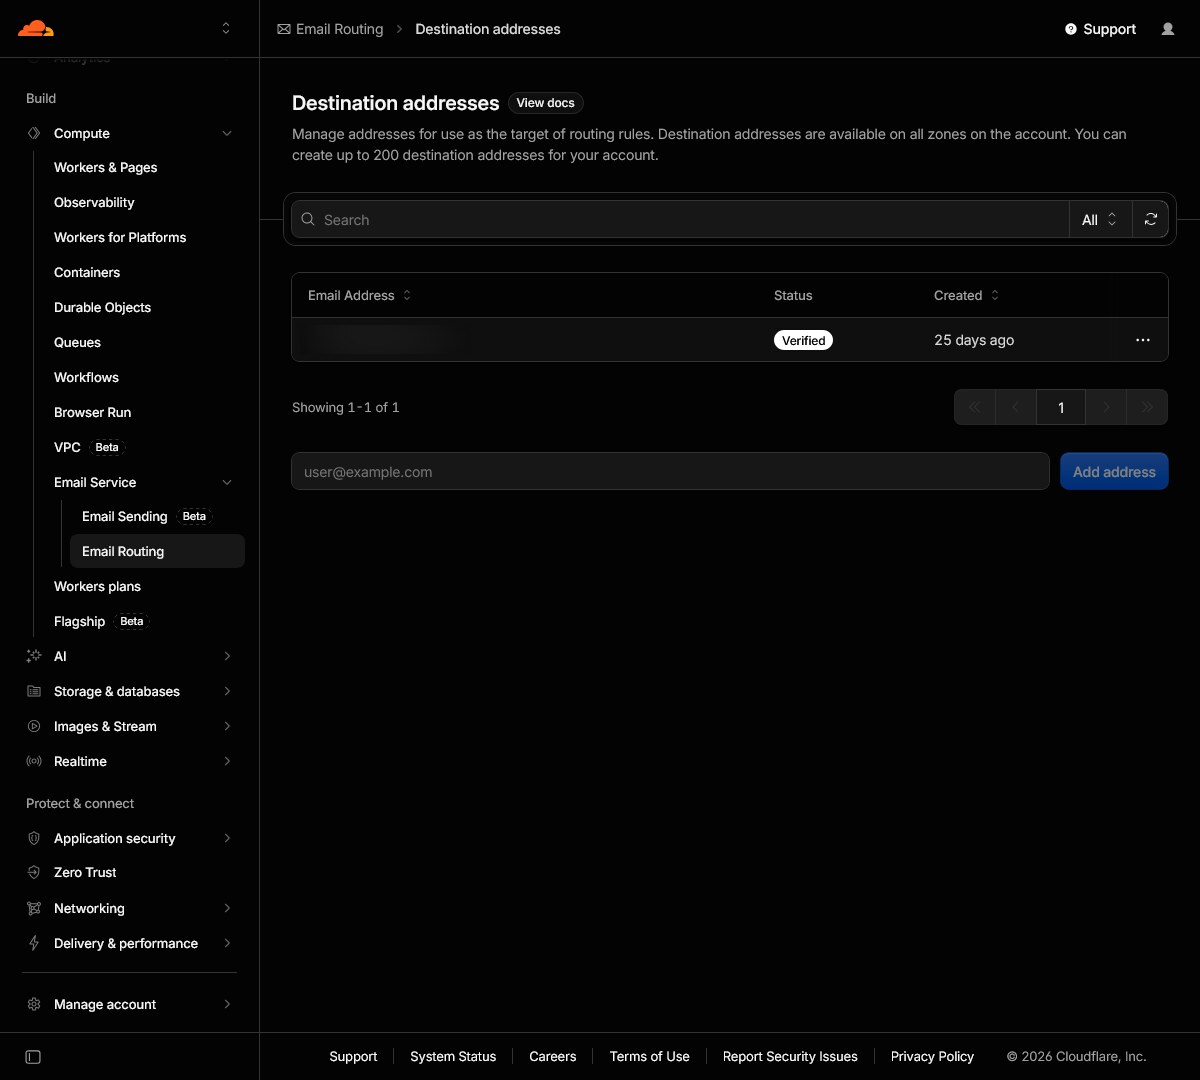
Here, you'll want to click the
Destination addresses button on the right and add your
actual email (the one that you will receive emails on).
You can add more than one, but for the sake of this guide, let's
assume you're only using a single final inbox.
You should get an email with a link to verify that you actually own it. Once you finish this verification, the email should be clearly marked as "verified".
5. MX Records
Now we want to make sure Cloudflare actually is the service handling
your emails.
On the same Compute ->
Email Service -> Email Routing page, you
should see a + Onboard Domain button. This should be pretty
straightforward and will automatically configure everything for you.
6. Where the Magic Happens
And finally, it's time to write a tiny bit of code that will handle all the actual stuff we're looking to do (aliases and routing emails).
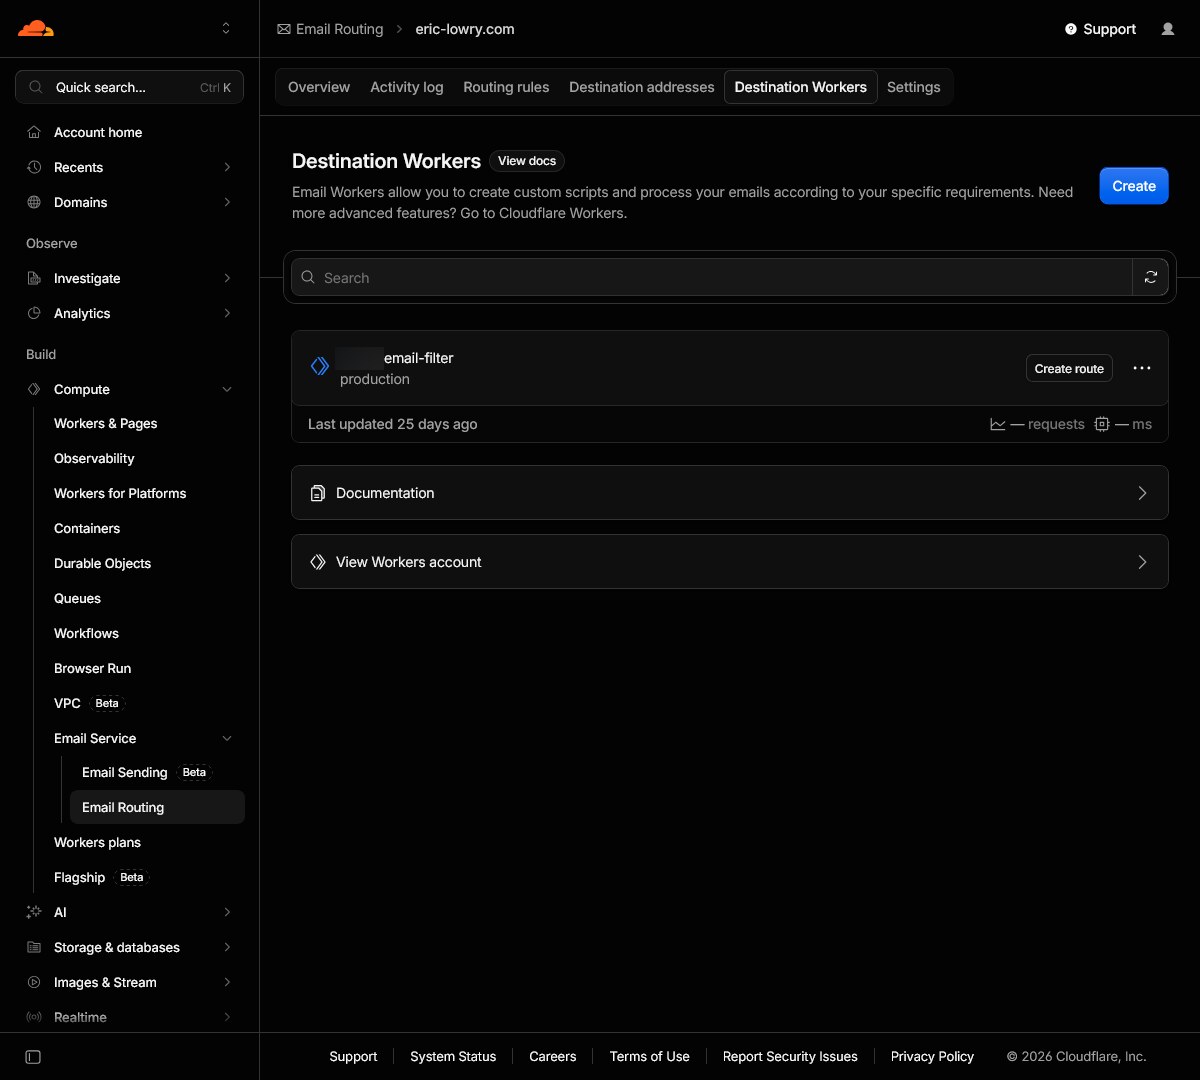
You should still be in Compute ->
Email Service -> Email Routing, but now
your domain name should be listed. Click on it and look for the
Destination Workers tab, pick
Create my own and press
Deploy.
You'll get the option to name the worker
something sensible, like email-filtering.
Now that it's created, we can click the ⋯ (three dots) menu to the right of the worker and pick the
Code editor to configure it.
Replace the existing code
with this template:
export default {
	async email(message, env, ctx) {
		const toAddress = message.to.toLowerCase();

		// SET THIS TO YOUR ACTUAL (DESTINATION) EMAIL ADDRESS
		const destination = 'your-destination-email@domain.com';

		// HERE IS WHERE WE BLOCK "BAD" EMAIL
		const blockList = ['spammer@your-domain.com', 'bad-alias@your-domain.com'];

		if (blockList.includes(toAddress)) {
			console.log(`Dropped burned alias: ${toAddress}`);
			return;
		}

		// HERE IS WHERE WE FILTER WHAT EMAIL FORMATS WE ALLOW
		// It's set up to use regex, which can be a little daunting.
		// However, you can easily find regex testing sites to help you figure things out.
		const pattern = /^[a-z0-9_\.-]+@your-domain\.com$/i;

		if (pattern.test(toAddress)) {
			await message.forward(destination);
		} else {
			console.log(`Dropped filtered email to: ${toAddress}`);
		}
	},
};
As you can see in the code, it includes two elements that you need to configure:
A. Destination email
As noted above, all emails that get sent to emails on your domain name will be routed to the destination email you configured in step 4. Just make sure the address you put here is the same one you verified, and you should be good.
[!TIP]
For people looking to route emails to different destination emails, you'll probably want to use the regex patterns to determine which email goes where, and use the if statements to route them appropriately.
B. Blocked emails
Remember how I was saying you can block "bad" email addresses that have fallen into the hands of spammers and advertisers? This is where you can do it. Just add that email to the list, and anything that gets sent to it will get sent into the void and never bother you again.
[!TIP]
Remember the commas after each email but the last ;)
C. Email filtering
This is an important step, as it allows you to only allow a specific email "format" or sets of "formats" to actually reach your inbox. If you don't do this, people could easily just use a random email address on your domain, and it would reach you. While this is technically fine, it could eventually lead to a ton of unwanted spam.
The default value I included has this part:
[a-z0-9_\.-]+ which essentially lets almost everything
through. Here are a few examples that you can replace that specific
section with to do various things:
contact-> onlycontact@your-domain.comis accepted.(contact|personal)-> bothcontact@your-domain.comandpersonal@your-domain.comare accepted.friend\.[a-z0-9_\.-]+-> anything works as long as it starts withfriend., so for examplefriend.rand0m-va1ue@your-domain.comwould work, but notcontact@your-domain.com.[a-z0-9_\.-]{3,8}-> anything works but it must be between 3 and 8 characters before the@, so, for example,info@your-domainworks, butme@your-domain.comwon't.
This may seem a bit daunting at first, and regex, which is what we're using here, is known for being hard to grasp and somewhat convoluted, but there are a TON of resources online to help you grasp how it works. I've barely grasped the surface with these examples; already, just by combining them, you can do a ton.
[!TIP]
If you want, you can enable Logs the worker's settings, which will allow you to see all the incoming email attempts that get blocked or filtered out.
7. Finishing up
When you're done, save your worker, and all we need to do to get the whole thing to work is to actually enable email routing using this ruleset we just wrote.
Navigate back to the Compute ->
Email Service -> Email Routing page, and
click on the domain you registered, and look for the
Routing rules tab.
Toggle the Catch-all section to Active.
Next click the ⋯ (three dots) menu to the right
of the Catch-all line and click Edit.
Pick Send to a Worker for the Action, and
the worker we previously created and named as the
Destination.
🥳 SUCCESS!! 🎉
You should now be able to receive
emails sent to any viable alias on your custom domain!!
DNSSEC
Remember how we disabled DNSSEC on your registrar? It's best to turn it back on, but now using a config provided by Cloudflare.
Navigate to Domains -> Overview ->
{your-domain} -> DNS ->
Settings, you should see DNS record values that you must
copy over to your registrar's DNSSEC configuration page (this exact
process can vary depending on the registrar, so look for help online if
it isn't obvious).
DMARC
To prevent anyone from spoofing your email (passing themselves off as
you), you should navigate to Domains ->
Overview -> {your-domain} ->
Email -> DMARC Management and follow the
instructions to set up the _dmarc
TXT record.
[!TIP]
You may want to change this DNS record from top=nonetop=rejectto actually block any inauthentic emails instead of just logging them. At least that's my understanding; I'm not really that well informed on how DMARC works.
Bonus Stuff
An extension to automatically generate aliases
Having gone to all the trouble of setting this up, I was kind of jealous of how the paid services (like Firefox Relay for example) can let you automatically inject a random email address whenever a site asks you for your email to create an account.
So of course, I found a vibe-coded extension, looked through the basic idea of how it worked, and went and coded my own:
Enter @ Site-specific Email Generator (available on Firefox and all Firefox clones).
It uses the actual domain name of the site you're on to generate and inject an email address that should work perfectly with your newly configured alias system. It even works on mobile!
| Gallery | |
|---|---|
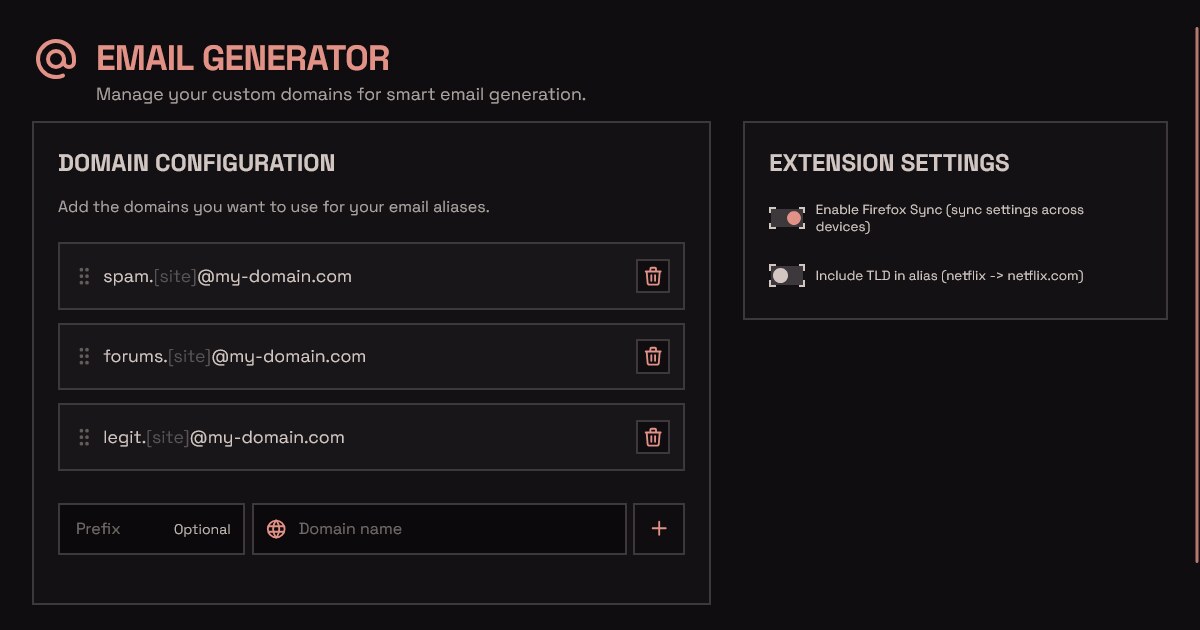 |
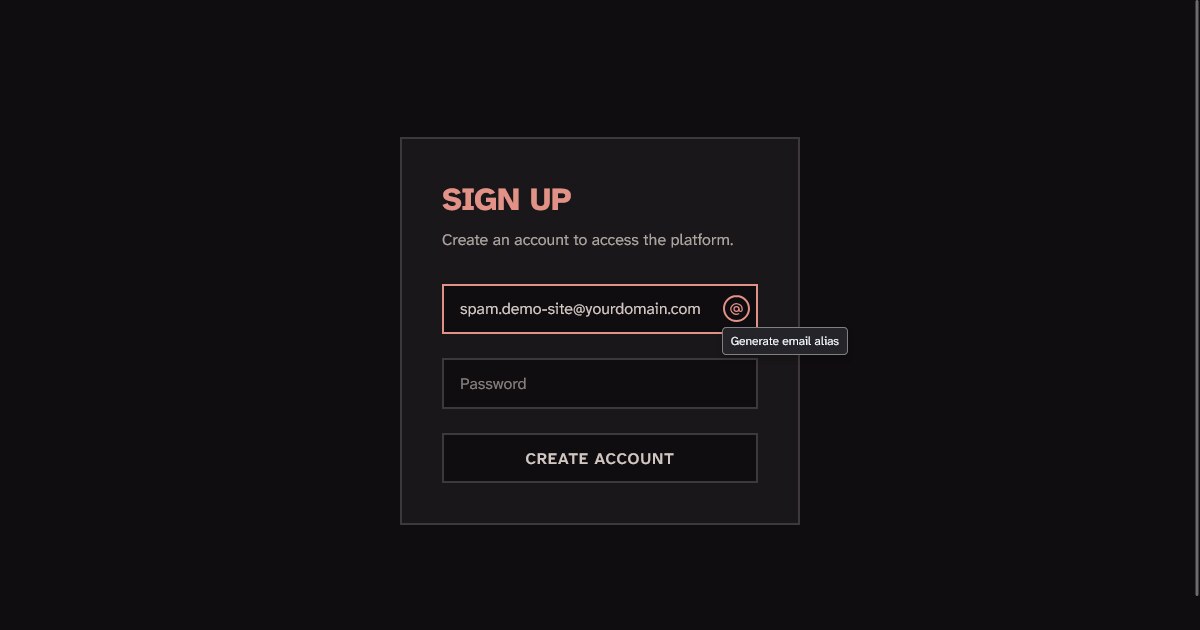 |
You can read more about it here.
Using GitHub for easy configuration
As I mentioned above, if you're into using Git, you can set Cloudflare up to grab your Worker's code from GitHub or GitLab.
Essentially, you just need a repo with the worker code inside an
index.js, and with a wrangler.toml next to it
containing:
name = "email-filtering"
main = "index.js"
compatibility_date = "2024-02-01"
workers_dev = false
preview_urls = false

[observability]
enabled = true
You'll then want to navigate to Compute ->
Workers & Pages in Cloudflare, click on your worker and
look for the Settings tab. From there, scroll down to the
Builds section and you should be able to attach the worker
to a repository.
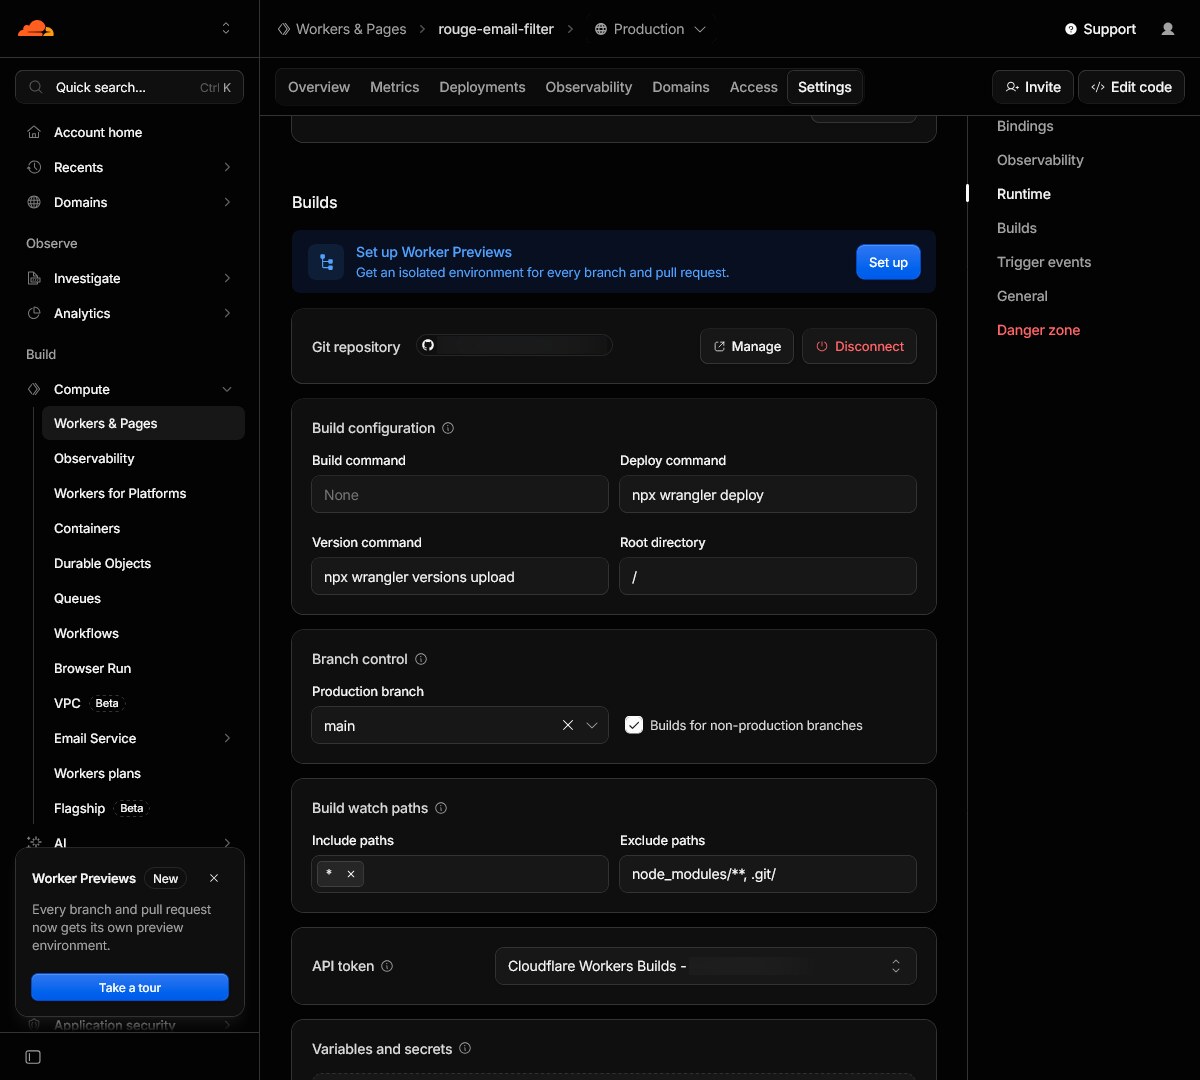
This makes changing the filters and block list trivial if you have the right kind of setup.
Email inbox tags/filtering
For the moment, I'm using Gmail, though I may later switch over to
Proton; but one advantage of this whole system is that the
to field of the email (who it's getting sent to)
actually uses the alias, not the real destination.
What this allows
you to do is to use the (somewhat wonky) Gmail filtering system to
automatically add labels based on what alias (or alias pattern) was
used.
Using an example from above, we could use a filter like
to:(friend AND *@your-domain.com) so any email that follows
the format friend.something@your-domain.com gets tagged as
Friends, and pushed into its dedicated inbox (or whatever
else you want to do with it).
[!TIP]
Gmail filtering is a mess, and it treats some punctuation as spaces, which is why the above example works specifically when using a.as a separator. I came to this conclusion after some trial and error, so feel free to test a few things before you decide on how to set up your filtering.